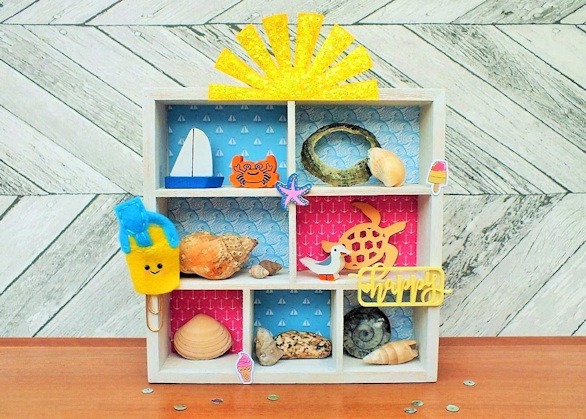
Hello, Jennifer here today, with a very happy seaside project!
We are always popping to the beach as here in Dorset we are lucky to live by lots of them, both sandy and stony, and on some you can even do fossil hunting. So me and my kids are always collecting interesting items, and I figured this kit was a perfect excuse to make a place to display them!
To make this for yourself….
- Start with a wooden shelf unit. I bought mine from The Works (you can see it here: https://www.theworks.co.
uk/p/craft-storage/wooden- storage-unit/5024418597520) but craft shops sell various shapes and sizes!

2. White-wash your shelves, using either Gesso or watered-down acrylic paint (use a ratio of 1 part paint to 1 part water). You don’t need to worry about painting the back-board as we’ll be covering those bits up with paper:

3. Measure the holes so you know how big to cut your pieces of paper:

4. Cut out the rectangles / squares of paper to fit inside your holes, using some of the papers from the August kit. Glue them in using a glue stick or double-sided tape:

5. Get out the sunshine stencil and tape it onto a piece of yellow card (I used a tag from the kit for convenience) using washi-tape – the tape is just to stop it moving around while you work. Then use a palette knife or old credit-card to scrape a layer of PVA glue through the stencil:

5. Get out the sunshine stencil and tape it onto a piece of yellow card (I used a tag from the kit for convenience) using washi-tape – the tape is just to stop it moving around while you work. Then use a palette knife or old credit-card to scrape a layer of PVA glue through the stencil:

6: Tip yellow glitter all over the stencil and glue:

7: Peel off the stencil straight away. Don’t leave it to dry or your stencil will be stuck to the card!:

8: Use a small paintbrush or cocktail stick to tidy up any edges where the glue went under the stencil. It doesn’t have to be perfect as you’ll be cutting the sun out once it’s dry. Now go and clean off your stencil and palette knife before the glue dries!:

9: Once the glue has dried cut out your sun. Use a hot-glue gun or other strong glue to stick your sun to the top of the shelf unit, and stick other items from the kit in a few other places on the shelves. I backed a couple of the little stickers with white card to stiffen them before cutting them out again and sticking them to the shelves:

10. Then fill your shelves with your favourite seaside finds and other beach-themed toys or trinkets:
This is now proudly on display in my living room!
Jennifer x

Leave A Comment